If you’ve ever dreamed of having long, thick, luxurious hair, tape hair extensions are the perfect solution for you. Unlike clip-in or sew-in extensions, tape extensions are virtually undetectable and can be customized to your specific hair type and style.

In this comprehensive 5-step guide, we cover everything you need to know about tape hair extensions, from choosing the right type to applying them yourself like a pro.
Step 1: Choosing the Best Tape Hair Extensions
1. Determine Your Hair Type: Tape extensions come in a variety of textures, including straight, wavy, and curly. Choose the texture that most closely matches your own hair for a seamless blend.
2. Decide on the Length and Thickness: Extensions are available in a wide range of lengths, from short styles to shoulder-length and beyond. Consider your personal style and the desired effect when choosing the length. The thickness of the extensions will also impact the volume and overall look.
3. Select the Right Color: It’s crucial to match the color of the extensions to your own hair as closely as possible. If you’re not sure what color to choose, consult with a professional hairstylist or colorist.
Step 2: Preparation and Application
1. Prepare Your Hair: Before applying the extensions, wash and dry your hair thoroughly. Avoid using any products that contain oils or silicones, as these can make the tape less adhesive.
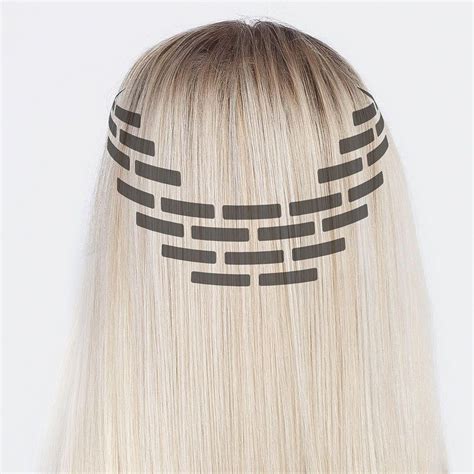
2. Divide Your Hair: Section your hair into small, horizontal layers. Start applying the extensions from the bottom layer and work your way up.
3. Apply the Tape: Remove the protective backing from the tape extension and carefully align it with the base of your natural hair. Firmly press the tape into place, ensuring it’s secure.
Step 3: Blending and Styling
1. Blend the Extensions: Once all the extensions are applied, use a brush to blend them into your natural hair. You can also use a hair dryer to heat style the extensions and make them more cohesive.
2. Cut and Style: If necessary, trim the extensions to match the length of your natural hair. Style the extensions as desired, using hot tools or styling products.
Step 4: Care and Maintenance
1. Regular Washing and Conditioning: Treat your tape extensions like your own hair. Wash and condition them with sulfate-free products and avoid harsh shampoos and brushing.
2. Avoid Heat Styling: Excessive heat styling can damage the tape adhesives. Use a heat protectant spray and limit the use of hot tools.
3. Brush Gently: Use a wide-tooth comb or a special brush designed for extensions to brush your hair. Avoid brushing too aggressively, as this can cause the tape to loosen.
Step 5: Removal
1. Use a Remover: To remove the tape extensions, apply a professional tape remover to the bond. Gently loosen the tape and slide the extension out.
2. Cleanse and Condition: After removing the extensions, wash and condition your natural hair to remove any residual adhesive.
Additional Tips:
- Consult with a professional hairstylist before applying tape extensions to ensure they’re the right choice for you.
- Avoid sleeping with wet hair, as this can weaken the tape adhesive.
- Use a silk pillowcase to reduce friction and prevent tangles.
- Get regular trims to remove split ends and keep the extensions looking their best.
Conclusion
Tape hair extensions offer a convenient and effective way to achieve beautiful, voluminous hair. By following these 5 steps, you can apply and maintain your extensions like a pro, enjoying the benefits of gorgeous, long-lasting hair.