Introduction
Braiding has captivated hair enthusiasts for centuries, transforming tresses into intricate works of art. Among the most iconic braiding techniques are the French braid and the Dutch braid, each boasting its unique charm and versatility. Whether you’re a seasoned pro or a novice yearning to elevate your hairstyling repertoire, this comprehensive guide will empower you to master the art of French and Dutch braiding, unraveling their intricacies and unlocking countless possibilities.

Understanding the Anatomy of a Braid
Before diving into the techniques themselves, it’s essential to grasp the fundamental components of a braid. A braid consists of three distinct strands of hair that are repeatedly crossed over and under one another, creating an interwoven pattern. The direction and manner in which these strands are manipulated determine the specific type of braid being crafted.
French Braid
Definition and Attributes
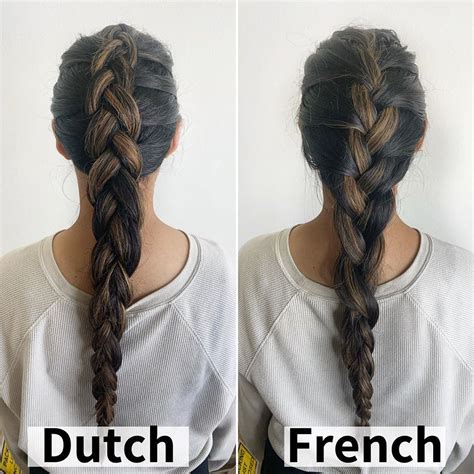
The French braid, also known as a three-strand braid, has been captivating hairdressers for generations with its elegant and timeless appeal. Originating in France, this technique involves incorporating hair from the sides into the braid as it progresses from the crown to the nape of the neck. The resulting braid appears slightly raised from the scalp, boasting a polished and intricate look.
Step-by-Step Technique
-
Section the Hair: Begin by brushing your hair thoroughly to remove any tangles. Section off a small portion of hair at the crown of your head, approximately 2-3 inches wide.
-
Create a Three-Strand Base: Divide the sectioned hair into three equal strands, labeled left, middle, and right.
-
Begin Braiding: Cross the left strand over the middle strand, then the right strand over the new middle strand.
-
Incorporate Side Hair: As you continue braiding, pick up a small section of hair from the left side and add it to the left strand. Repeat on the right side, adding hair to the right strand.
-
Cross and Repeat: Continue crossing the strands over one another, incorporating side hair each time. Ensure the tension is even to maintain a consistent braid.
-
Secure the Braid: Once you reach the nape of your neck, finish the braid by crossing the strands until there is no hair remaining to incorporate. Secure the end with an elastic band.
Dutch Braid
Definition and Attributes
The Dutch braid, also known as an inside-out braid, captivates hair enthusiasts with its bold and voluminous aesthetic. Unlike the French braid, which is created by crossing the strands over one another, the Dutch braid involves crossing the strands under one another. This subtle difference results in a braid that appears raised or elevated from the scalp, exuding a regal and eye-catching effect.
Step-by-Step Technique
-
Section the Hair: Start by brushing your hair thoroughly to remove any tangles. Section off a small portion of hair at the crown of your head, approximately 2-3 inches wide.
-
Create a Three-Strand Base: Divide the sectioned hair into three equal strands, labeled left, middle, and right.
-
Begin Braiding: Cross the left strand under the middle strand, then the right strand under the new middle strand.
-
Incorporate Side Hair: As you continue braiding, pick up a small section of hair from the left side and add it to the left strand. Repeat on the right side, adding hair to the right strand.
-
Cross and Repeat: Continue crossing the strands under one another, incorporating side hair each time. Ensure the tension is even to maintain a consistent braid.
-
Secure the Braid: Once you reach the nape of your neck, finish the braid by crossing the strands until there is no hair remaining to incorporate. Secure the end with an elastic band.
Comparative Analysis: French vs. Dutch Braid
| Feature | French Braid | Dutch Braid |
|---|---|---|
| Appearance | Raised from the scalp, elegant | Raised and voluminous, bold |
| Technique | Strands crossed over | Strands crossed under |
| Versatility | Suitable for all hair types | Particularly flattering on thick hair |
| Occasion | Casual or formal | Formal or occasions requiring a statement look |
Benefits of Mastering French and Dutch Braiding Techniques
Artistic Expression
Braiding offers a boundless canvas for creativity, allowing you to express your personal style through intricate and unique hairstyles.
Hair Health
Braiding can help protect your hair from damage and breakage, as it keeps the strands contained and prevents tangles.
Time-Saving
Braids are a practical solution for busy individuals, as they can last for several days with minimal maintenance, saving time on daily styling.
Versatility
French and Dutch braids are incredibly versatile, effortlessly transitioning from casual to formal occasions. They can be dressed up with accessories or worn on their own for a chic and polished look.
Therapeutic Benefits
The repetitive motions of braiding can have a calming and meditative effect, promoting relaxation and stress reduction.
Creative Applications of French and Dutch Braiding
Incorporate Braids into Updos
Elevate your buns and chignons by incorporating French or Dutch braids into the design, creating a stunning and intricate effect.
Create Braided Headbands
Fashion a unique and stylish headband by braiding a section of hair from one ear to the other, securing it with bobby pins.
Embellish with Accessories
Add a touch of glamour to your braids by accessorizing with hair clips, beads, or ribbons, transforming them into eye-catching statement pieces.
Experiment with Patterns
Play with different braiding patterns by alternating between French and Dutch braids or creating asymmetrical designs, unleashing your artistic vision.
Essential Tips for Perfect Braids
Practice Patience
Mastering braiding techniques requires patience and practice. Don’t be discouraged if your first attempts are not flawless; with time and dedication, you’ll achieve proficiency.
Use a Mirror
A mirror can be your best friend when braiding, providing you with a clear view of your progress and ensuring symmetry.
Keep Hair Moisturized
Moisture is crucial for healthy and manageable hair. Apply a leave-in conditioner or detangling spray to your hair before braiding to prevent breakage and split ends.
Secure Braids Tightly
To ensure your braids last, secure them tightly with elastic bands or hairpins. Avoid tying them too loosely, as they may unravel or become untidy.
Experiment with Different Hair Types
French and Dutch braids can be adapted to all hair types. Experiment with different hair textures and lengths to find the styles that best complement your locks.
Frequently Asked Questions (FAQs)
- Which braid is easier to master, French or Dutch?
Ans: The French braid is generally considered easier for beginners to learn, as the crossing of strands is more intuitive.
- Can I braid my hair with extensions?
Ans: Yes, you can use hair extensions to create longer and fuller braids. However, ensure the extensions match your natural hair texture and color for a seamless blend.
- How long does it take to learn how to braid?
Ans: The time it takes to master braiding varies depending on your skill level and the complexity of the braid. With regular practice, you can expect to become proficient within a few weeks or months.
- What are some common mistakes to avoid when braiding?
Ans: Some common mistakes include braiding too tightly (causing discomfort and damage), incorporating uneven sections of hair (resulting in an asymmetrical braid), and not securing the end properly (leading to unraveling).
- How often should I wash my hair when wearing braids?
Ans: The frequency of washing depends on your hair type and how long you plan to keep the braids in. Generally, it’s recommended to wash your hair every 3-5 days when wearing braids to prevent oil buildup and product accumulation.
- Can I sleep with braids in?
Ans: Sleeping with braids in is generally acceptable, as long as they are secured loosely enough to prevent discomfort. However, avoid sleeping on wet braids, as this can lead to tangles and breakage.
- How do I remove braids without damaging my hair?
Ans: To remove braids gently, use your fingertips to carefully undo the elastic bands or hairpins. Use a wide-toothed comb or detangling brush to remove any knots or tangles slowly and gently.
- Can I braid hair that is too short?
Ans: While long hair is ideal for braiding, it is possible to braid shorter hair. Consider using bobby pins or hair clips to secure the braids in place and prevent unraveling.