Introduction:

Braids are a versatile and timeless hairstyle, beloved by women of all ages. Among the most popular braiding techniques are the French braid and the Dutch braid, which create distinct yet equally stunning looks. This guide will delve into the intricacies of each style, providing step-by-step instructions, highlighting key differences, and exploring common mistakes to avoid.
Definition and Origins:
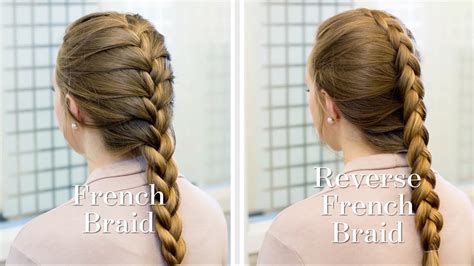
The French braid is a classic braiding technique that originated in France, as its name suggests. It involves separating the hair into three sections and weaving them together in an underhand pattern, gradually adding hair from the sides. The result is a secure, elegant braid that showcases the hair’s length and texture.
Step-by-Step Instructions:
- Brush your hair to remove any tangles and divide it into three equal sections.
- Cross the right section over the middle section.
- Now, cross the left section over the new middle section.
- Gather a small section of hair from the right side and add it to the right section.
- Cross the right section (including the gathered hair) over the middle section.
- Repeat steps 2-5 on the left side, gathering hair as you go.
- Continue braiding until you reach the end of the hair.
- Secure the braid with a hair tie or elastic band.
Key Features:
- Underhand braiding pattern
- Hair is added from the sides
- Creates a slightly raised, elegant braid
Definition and Origins:
The Dutch braid, also known as the “inside-out” braid, is a variation of the French braid that creates a bold, intricate look. Unlike the French braid, the Dutch braid involves crossing the hair sections overhand, resulting in a braid that appears to be popped out of the head.
Step-by-Step Instructions:
- Brush your hair and divide it into three equal sections.
- Cross the right section under the middle section.
- Cross the left section under the new middle section.
- Gather a small section of hair from the right side and add it to the right section.
- Cross the right section (including the gathered hair) under the middle section.
- Repeat steps 2-5 on the left side, gathering hair as you go.
- Continue braiding until you reach the end of the hair.
- Secure the braid with a hair tie or elastic band.
Key Features:
- Overhand braiding pattern
- Hair is added from the sides
- Creates a bold, popping-out braid
| Feature | French Braid | Dutch Braid |
|---|---|---|
| Braiding Pattern | Underhand | Overhand |
| Hair Added | From the sides | From the sides |
| Appearance | Raised, elegant | Bold, popping-out |
| Suitability | All hair types | Thick, long hair |
- Not brushing your hair: Tangled hair can make braiding difficult and lead to uneven results.
- Braiding too tightly: This can cause hair breakage and headaches.
- Not gathering hair correctly: Missing hair sections can result in gaps or unevenness.
- Braiding all the way to the end: Leave some hair at the bottom to prevent the braid from looking too bulky.
- Using too much hairspray: This can make the braid feel stiff and unnatural.
French and Dutch braids are both beautiful and versatile hairstyles that can elevate any look. By understanding the differences between them and following the step-by-step instructions provided, you can master these techniques and create stunning braids that will turn heads. Remember to avoid common mistakes and experiment with different hair textures and accessories to find your perfect braid.