Introduction

Braids have been a staple in hair styling for centuries, adding an intricate and elegant touch to any look. Among the most popular braiding techniques are the French braid and the Dutch braid, both of which offer unique characteristics and stunning results. In this article, we will delve into the intricacies of French and Dutch braids, comparing their techniques, benefits, and suitability for different hair types and occasions.
Techniques and Appearance
French Braid
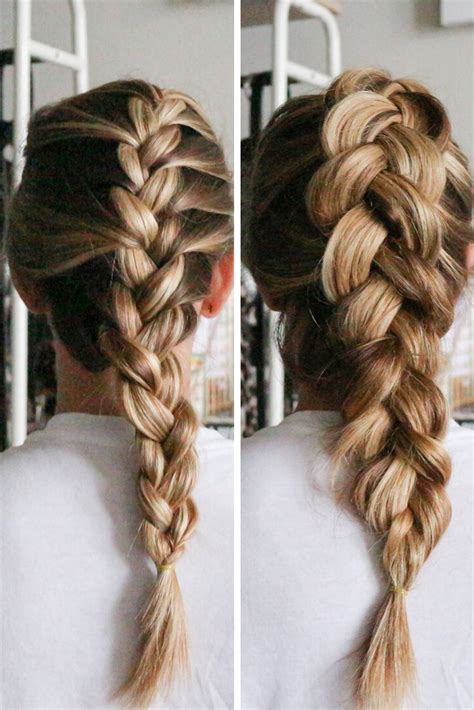
The French braid, also known as the French plait, involves dividing the hair into three sections and progressively adding hair from the sides as you braid down the head. The outer sections are crossed over the middle section, creating an intricate pattern that sits against the scalp.
Dutch Braid
In contrast, the Dutch braid, also known as the inside-out braid, flips the French braid technique upside down. Instead of crossing the outer sections over the middle, the outer sections are crossed under the middle. This creates a raised, textured effect that stands out from the head.
Benefits of Each Braid
French Braid
- Creates a smooth and elegant look
- Adds volume to the crown
- Hides thin or flyaway hair
- Suitable for all hair types and lengths
Dutch Braid
- Adds volume and texture throughout the entire braid
- Creates a bold and eye-catching statement
- Prevents the braid from loosening easily
- Ideal for thick or unruly hair
Suitability for Hair Types and Occasions
French Braid
- Hair type: Suitable for all hair types, from thin to thick
- Occasions: Formal events, everyday wear, weddings
Dutch Braid
- Hair type: Ideal for thick or unruly hair
- Occasions: Sports activities, casual outings, festivals
Step-by-Step Instructions
French Braid
- Section: Divide your hair into three equal sections.
- Cross: Take the right section and cross it over the middle section.
- Add: Pick up a small section of hair from the right side and add it to the new right section.
- Repeat: Cross the new right section over the middle section.
- Continue: Repeat steps 3-4, adding hair from both sides as you braid down.
- Secure: When you reach the desired length, tie the end of the braid with an elastic band.
Dutch Braid
- Section: Divide your hair into three equal sections.
- Cross: Take the right section and cross it under the middle section.
- Add: Pick up a small section of hair from the right side and add it to the new right section.
- Repeat: Cross the new right section under the middle section.
- Continue: Repeat steps 3-4, adding hair from both sides as you braid up.
- Secure: When you reach the desired length, tie the end of the braid with an elastic band.
Tips and Tricks
- Use a brush or comb to detangle your hair before braiding for smooth results.
- Secure the end of the braid with a small, clear elastic band to blend in with your hair color.
- Apply a small amount of hairspray or mousse to hold the braid in place.
- Accessorize your braid with clips, ribbons, or beads to add a touch of personal flair.
Common Mistakes to Avoid
- Pulling too tightly: Avoid pulling the sections too tightly as this can cause hair breakage.
- Adding uneven sections: Make sure to add equal sections of hair from each side to ensure a balanced braid.
- Losing track of over/under: Be conscious of whether you are crossing the sections over or under for the desired braid type.
- Finishing too low: If you finish the braid too low on your head, it may slide out easily.
Conclusion
Both the French braid and the Dutch braid offer unique and versatile ways to style your hair. While the French braid provides a sophisticated and sleek look, the Dutch braid adds volume and texture. By understanding the techniques, benefits, and suitability of each braid, you can choose the perfect style for any occasion. With a little practice, you can master these braiding techniques and elevate your hair game to new heights.
