Introduction
Braids, an intricate and timeless form of hair styling, have graced the heads of people across cultures and eras. Among the most popular braiding techniques are Dutch braids and French braids. While both create stunning and versatile hairstyles, they possess subtle differences that cater to distinct preferences and hair types.

Key Differences
1. Braiding Direction:
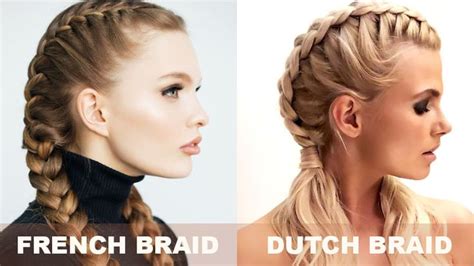
* Dutch braids: Braided from the underside, creating an elevated effect that appears raised from the scalp.
* French braids: Braided from the top, resulting in a more classic and flat appearance.
2. Hair Weaving Pattern:
* Dutch braids: Sections of hair are pulled over and under each other from the sides, gradually reducing the outer strands.
* French braids: Hair is divided into three sections, with the outer strands woven across the center.
3. Hair Volume:
* Dutch braids: Create a more voluminous and three-dimensional effect due to the elevated weaving technique.
* French braids: Tend to be flatter and closer to the scalp.
Which Braid Style Is Right for You?
The choice between Dutch braids and French braids ultimately depends on your hair type, desired look, and personal preferences.
1. Hair Type:
* Dutch braids: Suitable for thicker and coarser hair types as they provide extra volume and control.
* French braids: Ideal for thinner and finer hair types, as they offer a smoother and more polished appearance.
2. Occasion and Style:
* Dutch braids: Create a more dramatic and youthful effect, perfect for casual events and updos.
* French braids: Exude a classic and elegant look, making them suitable for formal occasions and everyday wear.
Common Mistakes to Avoid
Achieving perfect Dutch or French braids requires proper technique and attention to detail. To avoid common mistakes:
- Uneven tension: Ensure that the strands are pulled evenly to maintain a consistent braid.
- Overtightening: Avoid braiding too tightly, as it can cause breakage or discomfort.
- Loose ends: Secure the braid firmly with hair ties or bobby pins to prevent it from unraveling.
Step-by-Step Guide
1. Dutch Braids:
1. Brush hair to remove tangles.
2. Divide hair into three sections.
3. Cross the right section over the center section.
4. Cross the left section under the center section.
5. Repeat steps 3-4, gradually adding hair from the sides.
6. Secure the braid with a hair tie or bobby pins.
2. French Braids:
1. Brush hair to remove tangles.
2. Take a small section from the front and divide it into three strands.
3. Cross the right strand over the center strand.
4. Cross the left strand under the new center strand.
5. Add a small section of hair from the right side and cross it over the center strand.
6. Add a small section of hair from the left side and cross it under the center strand.
7. Repeat steps 5-6, gradually adding hair from the sides.
8. Continue braiding until you reach the nape of the neck.
9. Complete the braid with a regular three-strand braid.
10. Secure the braid with a hair tie or bobby pins.
Creative Applications
Harnessing the versatility of Dutch and French braids, hair stylists have developed innovative applications beyond traditional hairstyles.
- Dutch Braid Ponytail: Elevate a simple ponytail by adding a Dutch braid to the base.
- French Braid Headband: Create a chic and functional accessory by braiding a French braid across the forehead.
- Dutch Braid Bun: Combine the volume of Dutch braids with the elegance of a bun.
- French Braid Crown: Adorn a special occasion with an intricate crown of French braids.
Conclusion
Dutch braids and French braids offer distinct yet complementary hair styling options. Understanding their differences and mastering the techniques empowers you to create stunning and versatile hairstyles that suit your
