The Battle of the Blends: Which One’s Right for You?
Introduction

In the ever-evolving world of hair coloring, two techniques have emerged as frontrunners for creating effortlessly chic looks: balayage and ombre. Both methods involve blending multiple shades to create a seamless transition from one hue to another, but each has its unique characteristics that set it apart. This comprehensive guide will delve into the intricate differences between balayage vs ombre, empowering you to make an informed decision for your next hair transformation.
Balayage: The Subtle, Sun-Kissed Glow
What is Balayage?
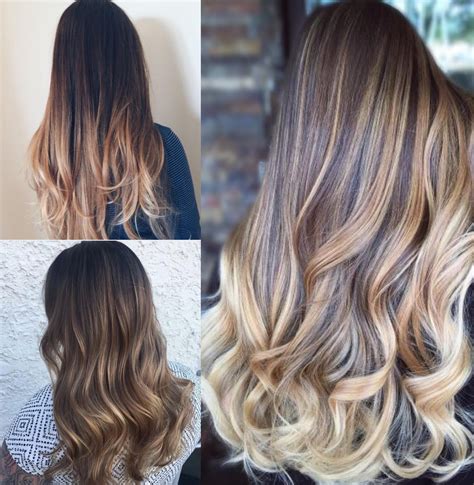
Derived from the French word “balayer,” which means “to sweep,” balayage is a freehand hair coloring technique that creates soft, natural-looking highlights by painting color onto the hair’s surface. The result is a subtle, sun-kissed glow that mimics the way hair naturally lightens in the summer sun.
Key Characteristics of Balayage:
- Freehand Application: Balayage is applied by hand, allowing the stylist to customize the placement and intensity of the highlights.
- Natural-Looking Blend: The transition from darker roots to lighter ends is gradual and seamless, creating a soft, blended look.
- Low Maintenance: Balayage requires less frequent touch-ups than ombre, as the regrowth is less noticeable.
- Suitable for All Hair Types: Balayage works well on both fine and thick hair textures.
Pros of Balayage:
- Adds depth and dimension to hair
- Enhances natural hair color
- Low maintenance and reduces damage
- Can be customized to suit individual preferences
Cons of Balayage:
- Can be time-consuming to apply
- May not be suitable for bold or drastic color changes
Ombre: The Dramatic Dip-Dye Effect
What is Ombre?
Ombre, meaning “shadow” in French, is a hair coloring technique that involves a gradual transition from one shade to another, creating a distinct dip-dye effect. Unlike balayage,ombre typically features a more prominent and contrasting color change between roots and ends.
Key Characteristics of Ombre:
- Gradual Transition: Ombre creates a visible and defined transition between colors, with the darker shade at the roots blending into a lighter shade towards the ends.
- Bold Color Change: Ombre allows for more dramatic color changes, making it suitable for those seeking a bold and eye-catching look.
- Higher Maintenance: Ombre requires more frequent touch-ups than balayage, as the regrowth is more noticeable.
- Suitable for Most Hair Types: Ombre works well on most hair textures, but it may be less flattering on very fine or short hair.
Pros of Ombre:
- Creates a striking and trendy look
- Allows for bold color changes
- Can add length and volume to hair
- Suitable for various hair textures
Cons of Ombre:
- Requires more frequent touch-ups
- May cause damage to hair if not applied correctly
- Not suitable for subtle or natural-looking color changes
Balayage vs Ombre Comparison Table
| Feature | Balayage | Ombre |
|---|---|---|
| Application Method | Freehand painting | Gradual blending |
| Color Transition | Soft, natural-looking | Visible and defined |
| Color Change | Subtle to moderate | Bold and dramatic |
| Maintenance | Low | Higher |
| Suitability for Hair Textures | All hair types | Most hair types (may not suit fine or short hair) |
Which Technique is Right for You?
The best hair coloring technique for you depends on your desired look, hair texture, and personal preferences.
Consider Balayage if you are looking for:
- A subtle and natural-looking hair color
- Low maintenance and reduced hair damage
- A technique that can be customized to your individual style
Consider Ombre if you are looking for:
- A bold and eye-catching color transformation
- A way to add length and volume to your hair
- A technique that can create a variety of trendy looks
Step-by-Step Balayage Guide
- Section Hair: Divide damp hair into small sections.
- Apply Lightener: Use a brush to paint lightener onto the surface of the hair, focusing on the mid-lengths and ends.
- Wrap Hair: Wrap each section in foil or plastic wrap.
- Process: Allow the lightener to process according to the manufacturer’s instructions.
- Rinse and Tone: Rinse the lightener out and apply a toner to balance the color and add shine.
- Dry and Style: Dry and style your hair as desired.
Step-by-Step Ombre Guide
- Section Hair: Divide damp hair into four equal sections.
- Apply Darkener: Apply darkener to the roots, leaving about 2-3 inches at the ends untouched.
- Apply Lightener: Use a brush to paint lightener onto the ends of the hair, starting at the point where the darkener ends.
- Blend: Use a comb to blend the darkener and lightener together, creating a gradual transition.
- Process: Allow the lightener to process according to the manufacturer’s instructions.
- Rinse and Tone: Rinse the lightener out and apply a toner to balance the color and add shine.
- Dry and Style: Dry and style your hair as desired.
The Future of Hair Coloring: Blending the Boundaries
As hair coloring techniques continue to evolve, we can expect to see a convergence of balayage and ombre techniques. Creative stylists are pushing the boundaries by combining the subtle blending of balayage with the bolder transitions of ombre, resulting in new and innovative looks.
Conclusion
Whether you opt for the natural glow of balayage or the bold statement of ombre, choosing the right hair coloring technique can transform your look and boost your confidence. By understanding the key differences between balayage vs ombre, you can make an informed decision that aligns with your individual style and hair goals. Embrace the art of hair color transformation and let your locks shine with vibrant, eye-catching beauty.
