Introduction
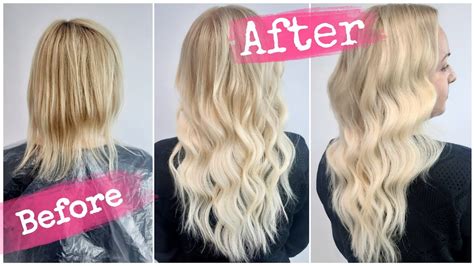
Thin hair can be a frustrating challenge, leaving you feeling self-conscious and limited in your styling options. But don’t despair! Extensions offer a transformative solution to add volume, length, and thickness to your locks. Here are five of the most effective extension types for thin hair:

Tape-In Extensions
What are they?
Tape-in extensions consist of individual strands of hair attached to thin, double-sided tape. They are applied by sandwiching your natural hair between two tapes and pressing them together.
Pros:
– Easy and quick to apply: Can be installed in around an hour.
– Long-lasting: Typically last for 6-8 weeks with proper care.
– Versatile: Can be styled using heat and blended seamlessly with your hair.
Cons:
– May be visible at the roots: Can become noticeable as your natural hair grows.
– Can damage hair: Improper removal or prolonged wear can result in breakage or thinning.
Clip-In Extensions
What are they?
Clip-in extensions are made up of wefts of hair attached to metal clips. They are applied by simply clipping them into your hair.
Pros:
– Removable and reusable: Can be taken out and put back in daily.
– Temporary: Perfect for special occasions or temporary volume.
– Affordable: Generally less expensive than other extension types.
Cons:
– Not as secure: Can slip out of thin hair easily.
– May be bulky: Can create an unnatural look if not applied properly.
Micro-Link Extensions
What are they?
Micro-link extensions are applied using small, beaded links that are attached to your hair with a special tool. The beads are squeezed shut to secure the extension strand.
Pros:
– Long-lasting and durable: Can last up to 6 months.
– Invisible: The beads are tiny and blend seamlessly with your natural hair.
– Customizable: Can be cut and colored to match your hair perfectly.
Cons:
– Time-consuming installation: Can take several hours to apply.
– Require professional removal: Must be removed by a hairstylist or extensionist.
– Can be expensive: One of the more costly extension types.
Sew-In Extensions
What are they?
Sew-in extensions are applied by braiding your natural hair into cornrows and then sewing wefts of hair into the braids.
Pros:
– Long-lasting: Can last for up to 3 months.
– Secure: Sewn-in extensions provide a very strong hold.
– Can blend well with various hair textures: Suitable for both fine and coarse hair.
Cons:
– Time-consuming installation: Can take several hours to apply.
– Can be uncomfortable: The cornrows can pull on your scalp.
– Difficult to remove: Must be removed by a hairstylist or extensionist.
Fusion Extensions
What are they?
Fusion extensions are individual strands of hair attached to a keratin bond. The bond is heated and melted onto your natural hair, creating a secure connection.
Pros:
– Long-lasting and invisible: Can last up to 6 months and blend seamlessly with your hair.
– Versatile: Can be styled using heat and colored like your natural hair.
– Can add significant volume and length: Suitable for extremely thin hair.
Cons:
– Time-consuming and expensive: Installation can take several hours and is typically the most costly extension type.
– Can damage hair: The heat and bonding process can cause breakage or thinning.
– Difficult to remove: Must be removed by a hairstylist or extensionist.
Common Mistakes to Avoid with Thin Hair Extensions
- Overextending: Applying too many extensions or using extensions that are too long can weigh down your hair and cause damage.
- Not blending the extensions: Leaving a visible line between your natural hair and the extensions can create an unnatural look.
- Ignoring care instructions: Improper washing, brushing, or styling can shorten the lifespan of your extensions and damage your hair.
- DIY installation: Attempting to install extensions yourself without proper experience can result in uneven application, damage, or even injury.
Choosing the Right Extension Type for Your Hair
Consider the following factors when selecting extensions for thin hair:
- Hair texture: Choose extensions that match the texture of your natural hair as closely as possible.
- Hair density: Opt for extensions that will provide the right amount of volume and thickness for your specific hair.
- Lifestyle: Select extensions that fit your lifestyle and maintenance routine.
- Budget: Determine how much you are willing to invest in extensions and consider the ongoing costs of maintenance.
Conclusion
Extensions for thin hair offer a transformative solution to regain volume, length, and confidence. By choosing the right type of extension and following proper application and care instructions, you can achieve beautiful, natural-looking results that will enhance your hair and boost your overall appearance.
Table 1: Comparison of Extension Types
| Type | Pros | Cons |
|---|---|---|
| Tape-In | Easy to apply, long-lasting, versatile | May be visible at the roots, can damage hair |
| Clip-In | Removable and reusable, temporary, affordable | Not as secure, may be bulky |
| Micro-Link | Long-lasting, durable, invisible, customizable | Time-consuming installation, require professional removal, expensive |
| Sew-In | Long-lasting, secure, can blend well with various hair textures | Time-consuming installation, can be uncomfortable, difficult to remove |
| Fusion | Long-lasting, invisible, versatile, can add significant volume and length | Time-consuming and expensive, can damage hair, difficult to remove |
Table 2: Average Lifespan of Extensions
| Type | Lifespan |
|---|---|
| Tape-In | 6-8 weeks |
| Clip-In | Removable and reusable daily |
| Micro-Link | Up to 6 months |
| Sew-In | Up to 3 months |
| Fusion | Up to 6 months |
Table 3: Estimated Cost of Extension Installation
| Type | Average Cost |
|---|---|
| Tape-In | $300-$600 |
| Clip-In | $100-$250 |
| Micro-Link | $600-$1,200 |
| Sew-In | $400-$800 |
| Fusion | $800-$1,500 |
Table 4: Maintenance Routine for Extensions
| Type | Washing | Brushing | Styling |
|---|---|---|---|
| Tape-In | Every 2-3 days | Use a wide-tooth comb | Avoid heat tools near the tape |
| Clip-In | As needed | Use a brush specifically designed for extensions | Can be styled using heat tools |
| Micro-Link | Every 3-4 days | Use a soft-bristled brush | Avoid heat tools near the beads |
| Sew-In | Every 1-2 weeks | Use a wide-tooth comb to brush the roots | Avoid heat tools near the braids |
| Fusion | Every 2-3 days | Use a brush specifically designed for extensions | Avoid heat tools near the bonds |