Introduction
In the ever-evolving world of hair extensions, tape-in extensions have emerged as a popular choice. They offer a seamless and versatile way to enhance your hair’s length, volume, and color. If you’re considering tape-in extensions, this extensive guide will provide you with everything you need to know, from choosing the right type to proper maintenance and removal.

Chapter 1: Types of Tape-In Extensions
- Remy Tape: Made from high-quality Remy hair, which keeps its natural cuticle layer intact, ensuring a natural look and feel.
- Non-Remy Tape: Derived from a mix of hair types, offering a more affordable option but may have some cuticles facing the wrong direction.
- Double-Sided Tape: Features wider tape strips with adhesive on both sides, providing extra hold.
- Single-Sided Tape: Has adhesive on one side only, making it easier to adjust the extension’s position.
Chapter 2: Choosing the Right Tape-In Extensions
- Match Your Hair Texture: Select extensions that match your natural hair texture for a seamless blend.
- Determine Length and Volume: Consider your hair’s length and desired fullness when choosing the number of wefts.
- Color Matching: Consult with a professional to ensure the extensions match your hair color for a natural look.
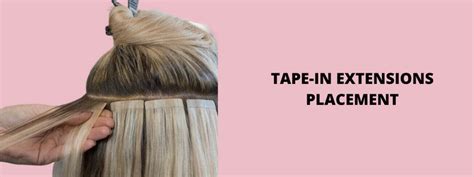
Chapter 3: Application Techniques
- Prep the Hair: Wash, dry, and detangle your hair before applying the extensions.
- Section and Apply: Divide your hair into sections and apply the tape extensions close to the scalp, using a tool to press them firmly together.
- Leave-In Time: Allow the adhesive to fully adhere for 24-48 hours before styling.
Chapter 4: Maintenance
- Regular Brushings: Brush your hair gently to avoid tangles and maintain shine.
- Avoid Heat: Limit the use of hot tools near the extensions to prevent damage to the adhesive.
- Use Sulfate-Free Shampoo: Sulfate-free shampoos help preserve the tape’s integrity.
- Regular Cleanings: Clean the extensions every 4-6 weeks with a mild shampoo and let them air dry thoroughly.
Chapter 5: Removal
- Use a Remover Solution: Apply a professional tape remover solution to break down the adhesive.
- Gently Use Tweezers: Use tweezers to gently loosen the bond between the extensions and your natural hair.
- Moisturize: Apply a hair mask or conditioner to nourish and repair your hair after removal.
Chapter 6: Innovative Applications
- Temporary Color Accents: Use tape-in extensions to add temporary color streaks or highlights without the commitment of permanent dyeing.
- Volume Boost for Thin Hair: Tape-in extensions can add instant volume and thickness to fine or thinning hair.
- Protective Styles: Cornrows, braids, and updos can be enhanced with tape-in extensions to create intricate and protective hairstyles.
Tips and Tricks
- Brush from the Ends Up: This helps prevent matting at the roots.
- Use a Heat Protectant Spray: Protect your extensions from damage caused by heat styling.
- Invest in Quality Hairpieces: High-quality extensions will last longer and look more natural.
- Consult a Professional: An experienced stylist can help you choose the right extensions and ensure a flawless application.
Customer Testimonials
“I love my tape-in extensions! They’ve given me the long, thick hair I’ve always wanted without sacrificing my own hair’s health.” – Sarah, 32
“Tape-in extensions are a lifesaver for my thin hair. They’ve added so much volume and made me feel more confident about my appearance.” – Jessica, 45
Conclusion
Tape-in extensions offer a versatile and convenient way to transform your hair. By following the tips and techniques outlined in this guide, you can achieve a natural and beautiful look that will boost your confidence and enhance your style. Whether you’re looking to add length, volume, or a touch of color, tape-in extensions are the perfect solution.
Table 1: Tape-In Extension Adhesive Types
| Adhesive Type | Hold Strength | Removal Difficulty | Cost |
|---|---|---|---|
| Acrylic | Strong | Moderate | Low |
| Silicone | Extra strong | Difficult | High |
| Polyurethane | Medium | Easy | Medium |
Table 2: Average Lifespan of Tape-In Extensions
| Quality | Maintenance | Lifespan |
|---|---|---|
| Economy | Poor | 6-8 weeks |
| Standard | Regular | 10-12 weeks |
| Premium | Excellent | 14-16 weeks |
Table 3: Typical Application Costs for Tape-In Extensions
| Hair Length | Number of Wefts | Cost |
|---|---|---|
| Short (12-18 inches) | 10-15 | $200-$400 |
| Medium (18-22 inches) | 15-20 | $300-$500 |
| Long (22-26 inches) | 20-25 | $400-$600 |
Table 4: Benefits vs. Drawbacks of Tape-In Extensions
| Benefits | Drawbacks |
|---|---|
| Seamless and natural look | Requires professional installation and removal |
| Easy to adjust and reposition | Can be more expensive than other extension methods |
| Versatile styling options | May cause irritation if the adhesive is not properly applied |
| Can last for several weeks | May damage natural hair if not applied carefully |