
Braided hair extensions have become an increasingly versatile and popular hair styling solution, allowing you to transform your look effortlessly. With a vast array of braiding techniques and extension types, the possibilities are endless. In this comprehensive guide, we will delve into the intricacies of braiding hair extensions, providing step-by-step instructions, exploring different braiding styles, and addressing frequently asked questions.
The type of braid you choose will significantly impact the final look and style of your hair extensions. Here are some of the most common braiding techniques used for extensions:
- Box Braids: Square-shaped sections are braided from root to tip, creating a bold and defined look.
- Cornrows: Similar to box braids, but the sections are smaller and braided closer to the scalp, resulting in a more intricate and sleek style.
- French Braids: Three strands are woven together, adding a touch of elegance to the hairstyle.
- Dutch Braids: A variation of French braids, where the strands are woven under instead of over, creating a raised effect.
- Goddess Braids: Chunky, loose braids that are braided from the nape of the neck to the front of the head, offering a bohemian and ethereal vibe.
- Micro Braids: Tiny, individual strands are braided close to the scalp, providing a natural-looking and long-lasting style.
Mastering the art of braiding hair extensions requires practice and patience. Follow these step-by-step instructions to achieve a flawless braid:
Step 1: Prepare Your Hair:
- Wash and condition your hair to remove any oils or products.
- Detangle your hair thoroughly to prevent snags.
- Section off the area you want to braid.
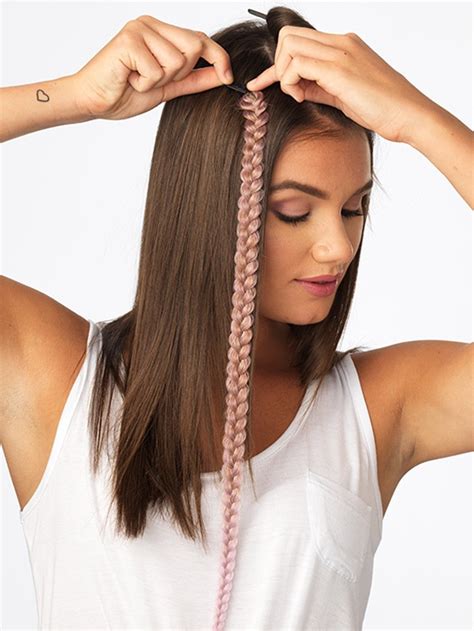
Step 2: Attach the Extension:
- Braid a small section of your own hair close to the root.
- Attach the hair extension to the braid using a rubber band or thread.
- Secure the connection with a clasp or glue.
Step 3: Begin Braiding:
- Start braiding the extension and your hair together, following the chosen braiding technique.
- Keep the tension even and tighten the braid as you progress.
- Add more hair extensions as needed to create the desired length and volume.
Step 4: Finishing the Braid:
- Once you reach the end of the extension, braid the remaining hair into a small section.
- Secure the braid with a rubber band or hair clip.
- Style the braid as desired, using hairspray or wax for hold.
The versatility of hair extensions allows for endless braiding possibilities. Here are some creative ideas to inspire your styling:
- Crown Braid: A half-up style where two braids are wrapped around the top of the head, forming a crown.
- Halo Braid: A single braid that wraps around the entire head, creating a halo effect.
- Ladder Braid: A variation of the French braid, where the hair is split into sections and crossed over each other to resemble a ladder.
- Twisted Braid: Two strands of hair are twisted together, creating a more casual and carefree look.
- Fishtail Braid: A delicate braid where the hair is divided into two sections and interlocking strands are woven together.
Braiding hair extensions offers numerous benefits, including:
- Hair Protection: Braiding protects your natural hair from damage caused by heat styling and environmental factors.
- Versatile Styling: Braids can be styled in various ways to suit different occasions and preferences.
- Length and Volume: Hair extensions add instant length and volume to your hair, transforming your look effortlessly.
- Long-Lasting: Braided hair extensions can last for several weeks or even months with proper maintenance.
- Versatile Color Options: Hair extensions are available in various colors, allowing you to experiment with different looks or match your natural hair.
The type of braid you choose should complement your hair texture and length. Here are some guidelines:
- Thin Hair: Avoid tight braids that can further thin out your hair. Opt for loose, voluminous braids instead.
- Thick Hair: Thick hair can handle bolder braids like box braids or cornrows.
- Fine Hair: Use smaller sections and avoid over-tightening to prevent breaking your hair.
- Long Hair: Long hair provides ample length for intricate braids and multiple extension rows.
- Short Hair: Braiding hair extensions can add length and volume to shorter hair, allowing you to achieve a variety of styles.
Here are answers to some of the most frequently asked questions about braiding hair extensions:
Q: How long do braided hair extensions last?
A: With proper maintenance, braided hair extensions can last for several weeks or even months.
Q: Can I wash my hair with hair extensions?
A: Yes, but avoid washing your hair too frequently to prolong the life of the extensions. Try to wash your hair every 2-3 days.
Q: How often should I get my hair extensions retouched?
A: Depending on the type of braid, you may need to get your hair extensions retouched every 4-8 weeks to maintain their appearance.
Q: Is it okay to sleep with hair extensions in?
A: Yes, but it is recommended to braid your hair or wrap it in a silk scarf to prevent tangling.
Braiding hair extensions is a versatile and rewarding hair styling solution that allows you to transform your look and enhance your natural beauty. By mastering braiding techniques, experimenting with different styles, and choosing the right extensions for your hair type, you can achieve a flawless and long-lasting braided look. Embrace the possibilities and let your creativity shine through your braids!