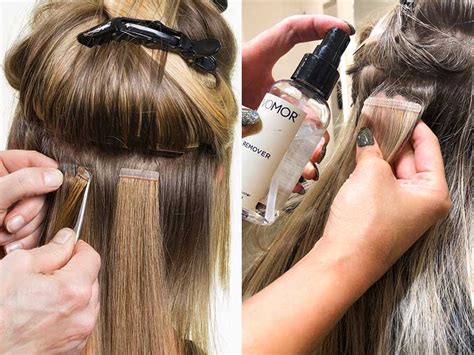
- 4 Essential Strategies for Choosing the Perfect Remover
- Tips to Gently Untangle and Lift Tape-In Extensions
- Step-by-Step Guide to Safe Tape-In Removal
Understanding Tape-In Extensions
Tape-in extensions are a popular semi-permanent hair extension method that involves attaching thin sections of hair to the natural hair with a double-sided tape adhesive.

- 15-20 strands of hair are attached to a single tape
- Last for 6-8 weeks with proper care
- Can be reused multiple times with professional removal and reinstallation
Why You Need a Tape-In Extension Remover
The adhesive used in tape-in extensions is designed to be strong and long-lasting, but it can also make removal difficult.
- Attempting to remove tape-in extensions without a specialized remover can damage the natural hair and cause breakage.
- A proper remover dissolves the adhesive safely and effectively, minimizing hair damage.
Choosing the Right Tape-In Extension Remover
Not all tape-in extension removers are created equal. Consider the following factors when choosing one:
- Type of Remover: There are two main types of tape-in extension removers: liquids and sprays. Liquids are more effective for dissolving adhesive, while sprays are easier to apply.
- Ingredients: Look for removers that contain safe and effective ingredients such as isopropyl alcohol, citrus solvents, or oils. Avoid harsh chemicals that can damage hair.
- Viscosity: The viscosity of the remover determines how easily it spreads and applies. A thicker viscosity is better for larger areas of adhesive, while a thinner viscosity is easier to apply to smaller areas.
- Cost: Tape-in extension removers can range in price from $10 to $50. Choose a remover that fits your budget and meets your needs.
4 Essential Strategies for Effective Tape-In Extension Removal
- Get the Right Tools: Invest in a high-quality tape-in extension remover, a wide-tooth comb, and a hairbrush.
- Section the Hair: Divide the hair into small sections to make removal easier and prevent tangling.
- Apply the Remover: Apply the remover liberally to the attachment area, using a cotton ball or brush. Let the remover sit for a few minutes to dissolve the adhesive.
- Gently Untangle and Lift: Use a wide-tooth comb to gently untangle any knotted hair. Slowly lift the tape-in extensions away from the natural hair.
Step-by-Step Guide to Safe Tape-In Removal
- Wash the hair with sulfate-free shampoo to remove any oils or products. Do not condition.
- Section the hair into small, manageable sections.
- Apply the tape-in extension remover to the attachment area. Let the remover sit for 3-5 minutes.
- Use a wide-tooth comb to gently untangle any knotted hair.
- Slowly lift the tape-in extensions away from the natural hair.
- Remove any remaining adhesive from the natural hair using the remover and a cotton ball.
- Rinse the hair thoroughly with water to remove any residue.
Tips for Minimizing Hair Damage During Removal
- Apply the remover liberally to ensure it reaches all the adhesive.
- Let the remover sit for the recommended amount of time to fully dissolve the adhesive.
- Use a wide-tooth comb to gently untangle any knotted hair.
- Avoid over-brushing or pulling on the hair during removal.
- Rinse the hair thoroughly to remove any residue that could damage the natural hair.
Common Mistakes to Avoid
- Using the wrong remover: Using a harsh or ineffective remover can damage the hair.
- Applying too little remover: Insufficient remover will not dissolve the adhesive effectively.
- Lifting the extensions too quickly: Lifting the extensions too soon can cause breakage.
- Using sharp tools: Sharp tools can cut or damage the natural hair.
- Neglecting aftercare: Failure to rinse the hair thoroughly or use a conditioner can leave residue and damage the hair.
Conclusion
Tape-in extension removers are essential for safely removing tape-in extensions without damaging the natural hair. By following these tips and choosing the right remover, you can ensure a successful and hassle-free removal process.
