Introduction

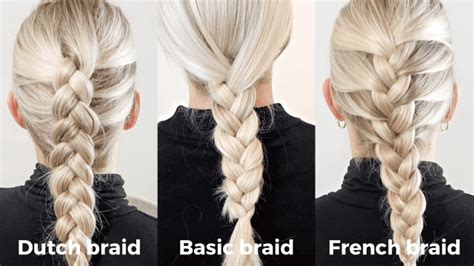
Braiding is an art form that has been passed down through generations, with countless variations and techniques. Two of the most popular and enduring styles are the French braid and the Dutch braid. While they share similarities, they also have distinct differences that make them suitable for different occasions and face shapes. This comprehensive guide will delve into the intricacies of both French and Dutch braids, providing step-by-step instructions, helpful tips, and expert insights to help you master these elegant hairstyles.
Part 1: French Braid vs. Dutch Braid
Table 1: Key Differences Between French vs. Dutch Braids
| Feature | French Braid | Dutch Braid |
|---|---|---|
| Origin | France | Netherlands |
| Texture | Loose, cascading | Tight, raised |
| Appearance | Delicate, feminine | Bold, striking |
| Suitability | Oval, round, or square face shapes | Diamond, heart, or triangular face shapes |
Part 2: Step-by-Step Tutorials
French Braid:
- Brush your hair to remove any tangles or knots.
- Divide your hair into three equal sections at the crown.
- Cross the left section over the middle section.
- Cross the right section over the new middle section (which was once the left section).
- Continue this process, alternating the left and right sections over the middle until you reach the nape of your neck.
- Secure the braid with an elastic band.
Dutch Braid:
- Follow steps 1 and 2 from the French braid tutorial.
- Instead of crossing over, cross the left section under the middle section.
- Cross the right section under the new middle section.
- Continue this process, alternating the left and right sections under the middle until you reach the nape of your neck.
- Secure the braid with an elastic band.
Tip: Practice makes perfect when it comes to braiding. Don’t be discouraged if your first few attempts are not as polished as you’d like. With patience and regular practice, you will master the technique.
Part 3: Common Mistakes to Avoid
- Tight braiding: Avoid braiding too tightly, as this can cause breakage and scalp tension.
- Uneven sections: Ensure that the three sections of hair you are working with are equal in size to create a balanced and symmetrical braid.
- Loose strands: As you braid, tuck any loose strands under the braid to prevent them from falling out.
- Messy ends: Secure the end of the braid with an elastic band or hair pin to prevent unraveling.
Part 4: Hair Hacks and Applications
Table 2: Updo Styles for Braids
| Updo Style | French Braid | Dutch Braid |
|---|---|---|
| Crown braid | Elegant and sophisticated | Striking and dramatic |
| Halo braid | Delicate and feminine | Edgy and unique |
| Waterfall braid | Romantic and ethereal | Bold and eye-catching |
| Twisted braid | Intricate and artistic | Modern and contemporary |
Table 3: Braid Variations
| Braid Variation | French Braid | Dutch Braid |
|---|---|---|
| Inverted braid | Braided from the nape of the neck upwards | Braided from the nape of the neck upwards |
| Fishtail braid | Woven from two strands of hair | Woven from two strands of hair |
| Lace braid | Featuring interwoven strands | Featuring interwoven strands |
Part 5: Conclusion
Whether you prefer the delicate elegance of the French braid or the bold statement of the Dutch braid, both hairstyles offer timeless beauty and versatility. By following the step-by-step instructions and avoiding common mistakes, you can master the art of braiding and create stunning hairstyles for any occasion. Embrace your creativity and experiment with different variations and updo styles to showcase your unique style and personality.
