Introduction
Braids have been an integral part of hairstyling for centuries, adding versatility, style, and protection to tresses across the globe. Two of the most popular braiding techniques are Dutch braids and French braids. Both offer unique benefits and aesthetics, making them suitable for a wide range of occasions and hair types. However, which one is the better choice for you?

This comprehensive guide will delve into the intricate details of Dutch braids and French braids, exploring their differences, benefits, styling tips, and step-by-step instructions. Whether you’re a seasoned hairstylist or simply looking to elevate your braiding skills, this guide will empower you to choose the perfect braid for any occasion.
The Difference: Dutch vs French Braids
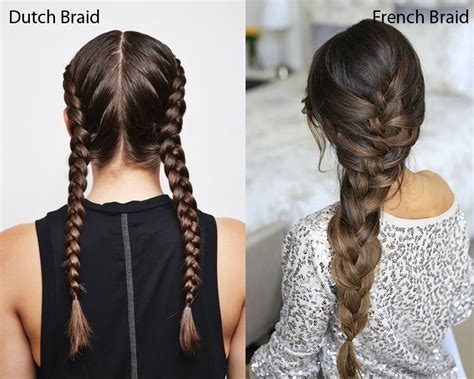
Dutch braids and French braids are both three-strand braids, but their construction techniques differ dramatically, resulting in distinct visual effects.
Dutch Braid (Inside-Out Braid)
- Technique: The strands are crossed under each other, giving the braid a raised and chunky appearance.
- Visual Effect: Bold, thick braid with prominent strands.
French Braid (Inside-In Braid)
- Technique: The strands are crossed over each other, resulting in a tighter, more intricate braid.
- Visual Effect: Sleek, elegant braid with a more subtle texture.
Benefits of Dutch and French Braids
Dutch Braids:
- Create a voluminous and textured look.
- Ideal for thick or long hair to add fullness.
- Can be styled in various ways, such as buns, crowns, and side braids.
- Provide excellent hold, making them suitable for long-lasting styles.
French Braids:
- Offer a more classic and polished look.
- Suitable for all hair types, adding a touch of sophistication.
- Can be incorporated into updos, ponytails, and half-up styles.
- Securely hold hair in place, making them practical for everyday wear or special occasions.
Styling and Versatility
Both Dutch braids and French braids offer endless styling possibilities.
Dutch Braids:
- Messy Braids: Create a relaxed and casual look by pulling apart the loops of the braid.
- Milkmaid Braids: Twist two Dutch braids together and pin them on top of the head for a whimsical style.
- Crown Braids: Braid a Dutch braid around the crown of the head, adding flowers or beads for a bohemian touch.
- Twisted Braids: Interlock two Dutch braids for a more intricate and voluminous effect.
French Braids:
- Fishtail Braids: Interlace the outer strands of a French braid for a unique and delicate look.
- Lace Braids: Remove strands from the French braid and loop them around the edges for an intricate and romantic style.
- Half-Up Braids: Divide your hair in half and braid the top section into a French braid for a versatile and chic hairstyle.
- Topsy-Turvy Braids: Push the strands of a French braid through the loops at the top to create a dramatic and twisted look.
Step-by-Step Braiding Instructions
Dutch Braid
Step 1: Section off a portion of hair at the crown of your head.
Step 2: Divide the section into three equal strands (A, B, C).
Step 3: Cross strand A under B.
Step 4: Take a small section of hair from the left (D) and add it to strand A.
Step 5: Cross strand A, with the added hair, over C.
Step 6: Repeat steps 4 and 5, alternating sides and adding hair as you go.
Step 7: Continue braiding until you reach the ends of your hair.
Step 8: Secure the braid with an elastic band.
French Braid
Step 1: Section off a portion of hair at the crown of your head.
Step 2: Divide the section into three equal strands (A, B, C).
Step 3: Cross strand A over B.
Step 4: Take a small section of hair from the left (D) and add it to strand A.
Step 5: Cross strand A, with the added hair, under C.
Step 6: Repeat steps 4 and 5, alternating sides and adding hair as you go.
Step 7: Continue braiding until you reach the ends of your hair.
Step 8: Secure the braid with an elastic band.
Choosing the Right Braid for You
The choice between a Dutch braid and a French braid ultimately depends on your personal preferences and hair type.
Choose a Dutch braid if you:
- Want a bold and voluminous look.
- Have thick or long hair that needs added texture.
- Are looking for a braid that can be easily transformed into different styles.
Choose a French braid if you:
- Prefer a more classic and polished look.
- Have all hair types, including thin or fine hair.
- Want a versatile braid that can be incorporated into various updos and hairstyles.
- Desire a braid that will hold your hair securely for extended periods.
Table 1: Dutch Braid vs French Braid Comparison
| Feature | Dutch Braid | French Braid |
|---|---|---|
| Technique | Strands crossed under | Strands crossed over |
| Appearance | Bold and chunky | Sleek and intricate |
| Volume | Adds fullness | Subtler texture |
| Versatility | Multiple styling options | Classic and elegant |
Table 2: Braiding Difficulty Level
| Technique | Difficulty Level |
|---|---|
| Dutch Braid | Moderate (Intermediate) |
| French Braid | Easy (Beginner) |
Table 3: Time Required for Braiding
| Technique | Time Required |
|---|---|
| Dutch Braid | 15-25 minutes |
| French Braid | 5-15 minutes |
Table 4: Suitable Hair Types
| Technique | Hair Types |
|---|---|
| Dutch Braid | Thick, long, coarse |
| French Braid | All hair types, including fine and thin |
Conclusion
Whether you opt for the bold and textured Dutch braid or the classic and elegant French braid, you’ll be adding a touch of style and sophistication to your look. By understanding the differences and benefits of each braiding technique, you can confidently choose the perfect braid for any occasion and hair type.
With a little practice and creativity, you’ll be able to master both Dutch and French braids, unlocking endless possibilities for hair styling. Embrace your inner hair enthusiast and explore the transformative power of these iconic braids.
