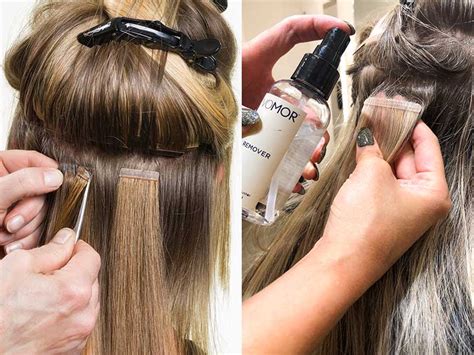
Tape extensions have revolutionized the hair industry, offering a convenient and long-lasting solution for adding volume and length to your natural hair. However, removing them can be a challenging and potentially damaging task if not done correctly. This comprehensive guide will provide you with step-by-step instructions, effective products, and helpful tips to ensure a seamless and damage-free tape extensions removal experience.

Step-by-Step Removal Process
Materials Required:
- Remover solution or professional removal spray
- Alcohol wipes
- Wide-tooth comb
- Oil or serum
- Towels
Instructions:
- Prepare: Section your hair into smaller parts to make the removal process easier. Avoid using water, as it can make the tape sticky.
- Apply Remover Solution: Apply a small amount of remover solution or spray to the base of each tape bond, avoiding contact with your scalp. Let it sit for the recommended time, as per the product instructions (usually 3-5 minutes).
- Use a Wide-Tooth Comb: Use a wide-tooth comb to gently loosen and separate the tape bond from your natural hair. Start at the root and gradually work towards the ends.
- Break Down the Bond: Once the tapes are loosened, you can use your fingers to gently break down the adhesive bond. Avoid pulling or tugging, as this can damage your hair.
- Remove the Tape: Carefully remove each tape from your natural hair, ensuring no residue is left behind.
- Cleanse Your Scalp: Use alcohol wipes to remove any remaining remover solution or adhesive from your scalp. Avoid using harsh products, as they can irritate your skin.
- Condition: Apply a generous amount of oil or serum to your hair to rehydrate and nourish it after the removal process.
Recommended Products
- Olaplex Tape-In Bond Remover: A professional-grade solution that gently dissolves the tape bond without damaging your hair.
- Redken Hair Cleansing Cream: A gentle shampoo formulated to remove tape extension adhesive residue while nourishing and protecting your hair.
- It’s a 10 Miracle Leave-In Conditioner Spray: A leave-in conditioner that detangles, rejuvenates, and protects your hair from heat damage and breakage.
Tips and Tricks
- Use a Heat Source: Applying heat to the tape bond can help soften the adhesive and make removal easier. Use a blow dryer on low heat or a warm towel.
- Work in Sections: Divide your hair into smaller sections to avoid tangling and damage. Remove one section before moving on to the next.
- Be Patient: The removal process takes time and effort. Avoid rushing, as this can lead to breakage.
- Don’t Overuse Remover Solution: Excessive use of remover solution can weaken your hair and cause damage. Use only the recommended amount.
- Avoid Pulling and Tugging: Gently separate the tape from your hair using a comb or your fingers. Avoid pulling or tugging, as this can cause breakage.
Common Mistakes to Avoid
- Using Water: Water can make the tape sticky and more difficult to remove. Avoid using water during the removal process.
- Pulling Too Hard: Pulling or tugging on the tape can damage your hair. Use gentle force and separate the tape slowly.
- Overusing Remover Solution: Excessive use of remover solution can weaken your hair and cause damage. Use only the recommended amount.
- Not Cleansing Your Scalp: Leaving behind remover solution or adhesive residue on your scalp can irritate your skin. Be sure to cleanse your scalp thoroughly after the removal process.
- Not Conditioning Your Hair: After the removal process, it’s important to condition your hair to rehydrate and nourish it. Avoid using harsh products that can damage your hair.
Pros and Cons of Tape Extensions
Pros:
- Versatile and customizable
- Can add volume and length to your hair
- Relatively long-lasting (up to 6-8 weeks)
- Can be styled with heat tools
- Minimal damage to natural hair
Cons:
- Can be expensive to install and maintain
- Requires regular maintenance (re-taping every 4-6 weeks)
- Can be difficult to remove without damaging your hair
- May cause scalp irritation or allergic reactions
Future Applications
The tape extensions industry is constantly evolving, with new innovations and advancements emerging. One area that holds promise for future applications is the development of biodegradable tape bonds. These bonds would be made from environmentally friendly materials that break down naturally over time, reducing waste and promoting sustainability in the hair industry.
Tables for Enhanced Understanding
Table 1: Estimated Cost of Tape Extensions
| Length | Cost |
|---|---|
| 10-16 inches | $200-$400 |
| 18-22 inches | $250-$500 |
| 24-26 inches | $300-$600 |
Table 2: Comparison of Tape Extensions Removal Methods
| Method | Pros | Cons |
|---|---|---|
| Professional Removal | Gentle and effective | Expensive |
| DIY Removal | Affordable | Can be damaging if not done correctly |
| Oil Removal | Natural and gentle | Time-consuming |
Table 3: Recommended Hair Care Routine After Tape Extensions Removal
| Step | Action | Benefits |
|---|---|---|
| Cleanse | Shampoo and condition your hair | Removes residue and restores moisture |
| Treat | Apply a deep conditioning mask | Nourishes and repairs damaged hair |
| Protect | Use a leave-in conditioner or serum | Prevents breakage and protects hair from heat damage |
Table 4: Common Mistakes to Avoid When Removing Tape Extensions
| Mistake | Consequences |
|---|---|
| Using water | Can make the tape sticky and difficult to remove |
| Pulling too hard | Can damage your natural hair |
| Overusing remover solution | Can weaken your hair and cause damage |
| Neglecting to cleanse your scalp | Can cause scalp irritation |
| Failing to condition your hair | Can lead to dry, brittle hair |
